Connecting the Atari ST to the Internet
In the following tutorial, I’ll describe how I connected my Atari ST to the Internet via using a cheap ESP8266 microcontroller as a WiFi-to-serial router – running at 19.2 kbit/s. Note that there are faster solutions for network connectivity for the Atari, such as NetUSBee or CosmosEx. However, the setup I describe here is about as low-cost as it can get. You’ll probably have to spend less than 10 USD for the hardware.
Also note that Internet on the Atari is of limited use; don’t expect to be able to surf modern websites with your ST. Simpler services such as chatting via IRC (Internet Relay Chat) or file downloads via FTP are possible, however.
UPDATE September 2022: See the PicoWifi project for an entirely different (and faster) way to connect an Atari to a Wifi network.
Disclaimer
I shall not be held responsible for any damage to your hardware or data for or other issues caused by this tutorial. Also, while I will try to answer your questions, please don’t expect me to provide professional support for everything described here. Please see below for alternative ways to get help.
Building the hardware
The core component is the ESP8266 microcontroller from Espressif with WiFi connectivity. I use it on an ESP-01 board, but any other board with this microcontroller will do just as well. Furthermore, you’ll need a level shifter such as a MAX3232 for the RS-232 serial port and a 3.3 V power supply. I wired everything according to this schematic:
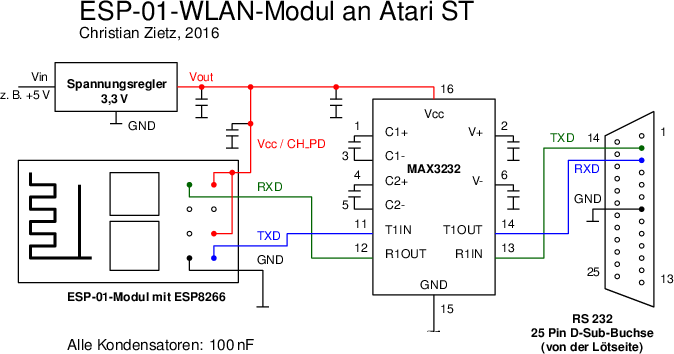
At least temporarily you’ll also need a serial cable for your PC (e.g. a USB-to-serial adapter) with 3.3(!) V logic levels to flash the firmware.
Flashing the firmware
The ESP8266 will act as a WiFi-to-serial router running the Serial Line Internet Protocol (SLIP) thanks to the esp_slip_router firmware by Martin Ger. I had to modify the firmware a little bit, for example to set the default serial bit rate to 19.2 kbit/s and to make this bit rate configurable. (In the meantime, the command to configure the bit rate has been added to Martin's original firmware as well.)
Download the modified firmware here and flash it using your preferred ESP8266 flash tool. For my ESP-01 board I used esptool and the following command – you’ll have to adapt com8 to the serial port you want to use for flashing:
esptool.py --port com8 write_flash -ff 40m -fm dio -fs 8m 0x0 0x00000.bin 0x10000 0x10000.bin
In case your ESP8266 has never been flashed with any firmware before, you also need to flash the file esp_init_data_default.bin, which you can download here. Symptoms of missing init data can be endless reboot loops of the ESP8266 and possibly wildly flashing LEDs on the module. The correct address depends on the size of the flash chip. You can read more details here. Then use the flash software such as esptool again, substituting the correct address and serial port for your module:
esptool.py --port com8 write_flash -ff 40m -fm dio -fs 8m address esp_init_data_default.bin
Getting and configuring the software
The setup of SLIP serial link on the Atari ST is not plug-and-play, in fact it was the thing I spent most time on. So you can now download a software package that I pre-configured for you, containing the STinG network stack for your Atari. The download will even fit on a 720k floppy disk. If you want to run it from harddisk – which I recommend – you’ll have to use a text editor to change the drive letter in AUTO\STING.INF and CONTROL.INF.
As it is usual on Atari TOS, you need to restore the correct order of the programs in the AUTO folder. In order to do this, first move DRVIN.PRG from the AUTO.TMP folder to the AUTO folder, then move MFP.PRG into the AUTO folder and finally move STING.PRG into the AUTO folder.
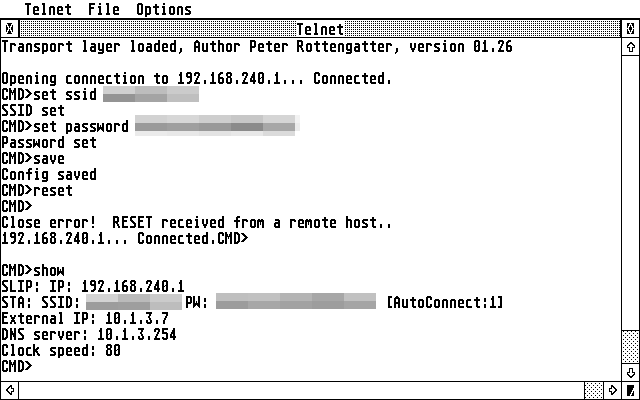
After booting from the floppy (or your harddisk), STinG will be installed. However, you still have to configure the WiFi-to-serial router to use your WiFi credentials. To do so, start TELNET.PRG and open a connection to host 192.168.240.1 and port 7777. You will get a CMD> prompt. Use the set ssid and set password commands to enter the login data to your WiFi, then enter the save and reset commands to store the configuration and restart the firmware. The connection will be lost after the reset command. Open a new connection to the same host and port number. The show command should then display that the module is connected to your WiFi. If it isn’t, double-check the login data. You can also use the scan command to see if your WiFi is visible to the ESP8266. Make a note of the DNS server shown.
See below for instructions to configure the serial bit rate used by the firmware. Be sure to read the warning there as well.
See the following screenshot for an examplary configuration session. Note that you will obviously get different values for the IP address and the DNS server.
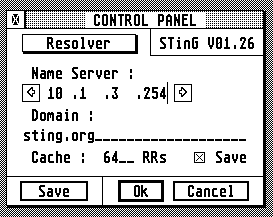
From the desktop accessory menu, select Control Panel, then STinG Protocols and Resolver. Enter the DNS server that was previously displayed to you into the Name Server field. Don’t forget to click Save. See this screenshot for an example:
Now what?
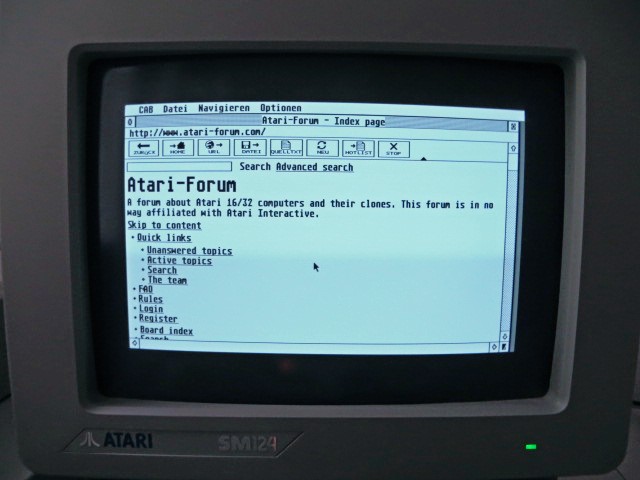
Your Internet connection is configured now and can be used with any program that supports the STinG or STiK network stacks. Apart from the Telnet client, I’ve also included an IRC (chat) client and the web browser CAB. However, please note that the versions of CAB and CAB.OVL are terribly outdated and are only included as a proof-of-concept. You can also find several suitable FTP and e-mail clients for the Atari, such as aFTP and aMail.
Increasing the connection speed
The default bit rate of the firmware is 19.2 kbit/s, the maximum speed that the MFP (serial controller) in the Atari ST is capable of without any hardware modification. However, more advanced Atari computers – such as the MegaSTE, TT or Falcon – can use higher bit rates on the serial port if the proper HSMODEM serial driver is used. Hence, I modified the firmware to allow you to configure the bit rate. To do so, use TELNET.PRG to connect to 192.168.240.1, port 7777 (same as above). At the CMD> prompt enter the set bitrate command, e.g. set bitrate 57600, then enter the save command. After the next power-up of the ESP8266 or after a reset command, the firmware will use the new bit rate.
In the desktop accessories menu, select Control Panel, then Serial Ports and change the bit rate of STinG accordingly. Don't forget to click Save.
Be aware that the firmware will accept any bit rate. If you set a bit rate not supported by your computer, you will not be able to use TELNET.PRG to change it again. If the module is still connected to your WiFi and you know its IP address (shown as External IP with the show command) you can telnet to this IP and port 7777 from another computer in your WiFi to change the configuration. Otherwise, you will have to erase the flash of the ESP board, e.g. with esptool, and then reflash the firmware to revert to 19.2 kbit/s. So, be sure to double check the bit rate before you enter the save command.
Limitations
As mentioned above, the connection speed is limited by capabilities of the ST’s serial port. Furthermore, the WiFi-to-serial router does network address translation for outgoing connections only. Incoming connections will not work. This means that you cannot run a server on your Atari and that FTP file transfers will only work in the passive mode.
Questions?
I very much prefer if you ask your questions in this Atari Forum thread because then others can benefit from the answers. Also, please don’t expect me to reply immediately, this is only a hobby project of mine.
Written by Christian Zietz
Last updated 2022-09-02